Tuesday, October 30, 2012

Lightbox Tutorial


This is a project I did for Mia earlier this year but I'm posting instructions so my sweet friend can understand my rambling :)

Anyway, I wanted something like this light box for Mia without the $200 pricetag (as an aside, there are actually some good deals on Amazon right now...it might be easier to purchase one now than make one...at the time I made this they were all $150+). That said, here's how I made ours (for around $25)...

Supplies


- Plastic container. You can use any translucent container but keep in mind that it shouldn't be too tall (otherwise the light won't be very strong) and is big enough to hold your light source. Ours is about 6 inches high. Also, be sure to look at the BOTTOM of the container, since this will serve as the top of the lightbox. Be sure you can live with any weird logos or ridges :) Ours has a raised ridge all the way around the edge but it is fine (and keeps things in place).


- Metallic/Shiny Spray Paint  The idea is that the paint will reflect the light back to the top of the light box. You could also probably get away with using aluminum foil or flashing instead. You may want to use Plastic Fusion but it isn't a must (I didn't...the store didn't have it and I was impatient to make the lightbox). If you only can find a clear plastic container, spray it first with glass frosting spray paint so the light can be diffused.


- Battery operated lights I love these ones because they have a remote control button you can stick on the side. I only used one and it works well (two might be even better, I'm just a cheapskate ;)

All you have to do is:
1. Spray paint the SIDES (not bottom) of the box with the metallic spray paint. Spray the bottom of the box with glass frosting spray if needed. Let dry.
2.  Affix the light strip to the top of the the box.  Stick the remote button on the side to serve as an on/off switch.
3. Gather up fun stuff to use on the light box! Marbles, plastic ice cubes, shot glasses.... :)


More ideas for light table fun:

Laminated tissue paper, leaves and toys from StrongStart

Colored Epsom Salt recipe from Watch Me Play and Learn

Color paddles, glitter sticky hands, and transparent blocks at Oriental Trading

Friday, October 12, 2012

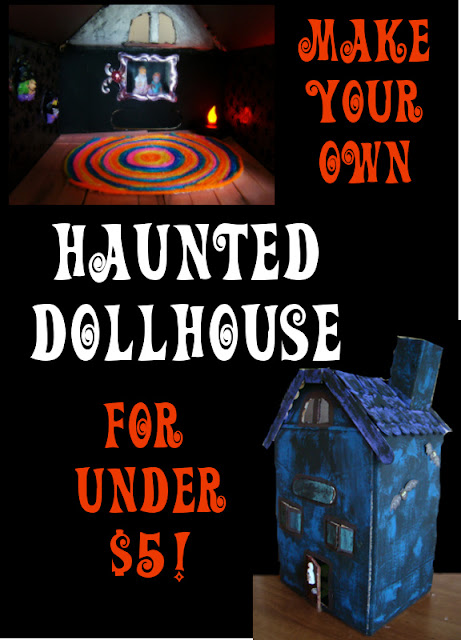
Haunted Dollhouse on the Cheap!

I was making a Halloween sensory bin for Mia and didn't like how it was turning out...it needed something...a haunted house! Since I don't own one, I decided to throw one together out of a cardboard wipes box. As usual, I got carried away and in the end probably had just as much fun making it as Mia will playing with it!


Supplies
  • Cardboard box (freesies!)
  • Hot glue (on hand, of course!)
  • Popsicle Sticks (I had them on hand but I calculated it out to be about 50 sticks costing around .80)
  • Acrylic Paint (I just used the cheap stuff I had on hand from a sale at Michaels...so approx $2 in paint to buy them for the project. I used black, purple and blue).
  • Embellishments  (Here the cost will vary depending on what you want to include and what you have on hand. I factored in half of the budget, around $2.50 for this so you can go crazy. Lol). Here's what I did:
    • Stuff I had around: yarn, stickers, fabric scraps, Halloween scrapbook paper from last year
    • Stuff I splurged on: Halloween ornaments ($1 at Michaels) & Frame stickers ($1.50 at Michaels)...everything Halloween was 50% this week :)

How-To

1) Pick a box, any box. Corrugated is stronger. Taller is spookier.


2) Cut the box in half.


3) Cut the roof. You can use a ruler but I just eyeballed it because it's a haunted house and everyone knows ghosts hate symmetry. :-)


4) Mark and cut windows and door in box. Again, I just freehanded it since the house is supposed to look like its in disrepair. :-)


5) From the other half of the box, cut a square that fits snugly within the box you have just cut your door and windows into. This piece will be the floor/ceiling of the two rooms. Hot glue the piece in place.

6) Fold the sides of the box in to the roof edges you cut. Hot glue them in place.


7) Make a chimney by cutting off one of the top flaps from the box section that isn't becoming the house and marking four lines about 1 inch apart. Fold along the lines. Before gluing, cut a slant in the bottom of the chimney. This is where it will sit flat against the roof. Hot glue the chimney edges together and then to the roof of the house.


8) Add popsicle sticks for the roof. Glue single sticks to the roof. Cut the edges off some with regular craft scissors and layer them on top of the long sticks to create a tiled effect.

Now...Decorate! You can do so much with these rooms. Here's what I did:

  • I used the left over centers of popsicle sticks (from making the tiles in the roof) to make a hard wood floor. I stained it with black acrylic paint watered down.
  • I made a yarn rug by cutting cardstock in an oval and hot gluing yarn in concentric circles onto the cardstock.
  • I glued some spider scrapbook paper to the walls and ghost scrapbook paper to one of the ceilings. I cut some into "tiles" for the first floor. 
  • I slid fabric scraps onto a toothpick and hot glued the toothpick over the windows to create a curtain rod and curtains.
  • Hot glued the Halloween ornaments to door, and walls.
  • I found these terrific stickers that look like frames. I asked Mia if I should put ghosts or monsters in them and she said..."how 'bout Mia?" I thought that sounded like a great idea! So, I had the girls put on the silly headbands we found at the Target dollar bins and snapped a few pics. Printed them out on my computer to the frame size and now they are part of the house's decorations! (I think that is by far my favorite part of the whole house!!)


Happy Haunting!


Follow Me on Pinterest


Saturday, October 6, 2012

Bathtub Art


About nine months ago, I made Mia some bath paints and was so excited to do them with her. Unfortunately, it was such a bust! Because of her SPD (which we didn't really know about at the time), she flipped out. She began to paint - which she loves to do - but then started panicking and crying. I can't be sure but I suspect she didn't like the sensation once she touched the paints and then panicked because she felt trapped in the tub and couldn't get away from that feeling.

Fast forward to the other day when we were cooped up inside on a rainy day and looking for something fun to do. I decided to muster up my courage and give bathtub paints another try.  I was hopeful since Mia has been making great strides since starting OT and I also figured I could always - literally - pull the plug if it got to be too much. Luckily, she had a BALL!

We made the paints together before hand and this time I used an ice cube tray to hold the paints. I love this recipe and the best part is, because it's made of soap once we're done the bath is cleaner than when we started!